

The good and bad side of your crochet work:
from amigurumi to C2C
Are you ever confused about the good and bad side of your crochet?
Your crochet work can look different than you expect, because a crochetwork has 2 sides. It is not always easy to recognize the right side of your crochet, but that is important for the end result.
In this blog I am going to explain how you can recognize the good and bad side in different crochet techniques, such as amigurumi and C2C.
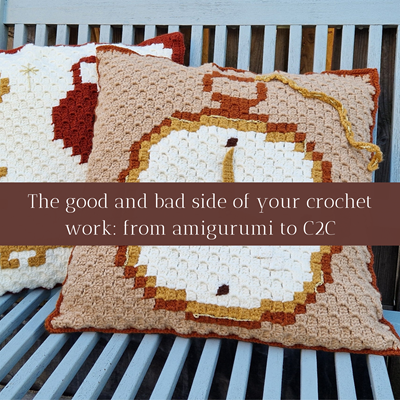
Marja from Pixel 2 Mix has provided a number of photos for this blog, such as that of her Sacha C2C blanket and Caroline showing her hat from the inside and outside.
What is the good and bad side of your crochet?
Right, wrong, inside or outside?
Does your crochet work look different from what you see in the photos of the designer? That can happen!
Your crochet always has 2 sides whether you crochet a blanket, a pillow or an amigurumi doll. These sides don't look exactly the same. There is always a front and a back or a good and a bad side or an inside and an outside. It just depends on what name you give it.
Often the pattern already indicates what the front and back is, such as in a C2C pattern, but that is not always the case.
Personal preference
Sometimes it's just a matter of personal preference which is the right and what is the wrong side of your crochet work. What do you like best! That's the most important thing!
Be consistent in your choice
It's important to consider the right side throughout your crochet project. So once you've decided that the side with the V's is the outside of your amigurumi, you need to make sure it stays that way throughout the crochet process. I'll explain what the V's are with amigurumi in a moment.
Why is consistency important?
- If you alternate between the good and bad side while crocheting, your crochet can look uneven. This is because the stitches are different on one side than on the other.
- Some patterns are specifically designed with a particular side as the right side. If you're not consistent, the pattern may look different than intended.
- When finishing your crochet work, such as weaving in threads, it is useful to know what the right side is. This way you can hide the wires on the wrong side, so that they are not visible on the right side.
Amigurumi
Amigurumi creations are crocheted in the round. This automatically creates 2 different sides: an inside and an outside or a wrong and right side.
How can you tell the difference between the right and the wrong side?
You can tell from the stitches what the inside and what the outside is. Just look at these examples. On the first picture you can see the right (outside) side of the crochet. There you see all kinds of V's. On the second photo you can see the wrong (inside) side of the work, there you can see all kinds of stitches that look like the letter Pi.


- The side with the V's is considered the right side, so the outside of your amigurumi. But that is not mandatory. If you like the other side better, then that's the right side for you. A matter of personal preference.
- Amigurumi often starts with a Magic Ring, the thread with which you pull the Magic Ring is always on the inside, so wrong side, of your crochet work.
- If you crochet with the right, you always crochet clockwise, if you crochet counterclockwise, you crochet on the wrong side. At Amigurumi you often start with a circle. This circle tends to curl inwards, causing the wrong side to curl out. You simply curl your work and you crochet, clockwise, on the right side.
- If you want to decrease invisibly with amigurumi, you won't see any of it on the outside, if you turn your work around, you will clearly see the decreases.
Tips to stay on the right side of your crochet work
- Mark the beginning of your row with a stitch marker. This way you always know where you are and which side is the right side.
- Pay close attention to how the stitches look on the side you chose as the right side. This way you can recognize this side more easily while crocheting.
- Check regularly to make sure you're still crocheting on the right side.
Consistency in your choice of the right side ensures that your crochet looks nice and even, that the pattern is correct and that the finish is neat.

C2C (Corner to Corner)
C2C crochet, also known as Corner to Corner crochet, is a popular crochet technique that involves crocheting a grid of small squares (or "pixels") that are diagonally relative to each other. You'll start in one corner of your project, often in the bottom right, and work diagonally to the other corner, in the top left, gradually expanding the grid.
If you have never crocheted C2C before, it is advisable to practice with this first. So that you know how to increase, decrease and change colors.
Take a look at YouTube, there you will find several videos where C2C technology is explained very clearly.
The front and back of C2C
C2C is a popular technique and is often used to crochet the most beautiful graphic patterns in pillows and blankets.
With the Corner 2 Corner technique, you also have a front and a back. The diagram that belongs to the pattern always states the front and back.
In the following photos you can see the front and back of a pillow. With this cushion cover I didn't tie off the threads at the back and tucked them away, but just let them continue.
On the other 2 photos you can see the front and the back of a blanket. You can imagine that it is logical and much nicer to tie off the threads and hide them.
If you're not consistent in maintaining a front and back with C2C hooks, your pattern may end up the other way around.


Other crochet techniques
Relief stitches
Relief stitches are stitches that are worked in front of or behind another stitch, creating a raised or lowered effect. Think of a double crochet that you crochet in front or behind.
Because the stitch is worked in front of or behind another stitch, a clear 3D effect is created. On the right side, you can clearly see the relief coming forward, while the back is flatter.
This effect is especially visible with larger relief stitches, such as relief double crochets. If a pattern only works with relief stitches that are worked along the front, then there is a clear front of your work. If the relief stitches alternate in front and back, there is often no real front or back.
Cable crochet
Cable crochet is a technique in which stitches are worked over each other, creating a cable pattern. They are relief stitches that are only visible on the front of your crochet work. It is therefore important to keep a close eye on the front and back of your work.


Practical tips
I have a few handy general tips for you to distinguish the right from the wrong side.
- Mark the beginning of your row with a stitch marker.
- The more you crochet, the easier it will be to tell the difference.
- If you're not sure, ask an experienced crocheter to help you.
- When in doubt, make a swatch and look at both sides.
Conclusion: Your Crochet, Your Choice
Whether you're crocheting amigurumi, making a C2C blanket, or experimenting with relief stitches and cables, the "good" and "bad" side of your crochet is ultimately a matter of personal preference. The most important thing is that you are consistent in your choice and that your crochet looks the way you want it to.
Remember that there are no strict rules. The V's on amigurumi are a handy guideline, but if you like the Pi symbols better, go for it! In C2C, it's essential to follow the pattern, but even there, you can get creative with the back. And with relief stitches and cables, it is especially important that the relief and the cables come into their own.
With the tips and techniques in this blog, you are now better equipped to recognize the good and bad side of your crochet work. But remember: crochet is a creative expression. Don't be limited by rules, but let yourself be guided by your own feelings and tastes.
Keep experimenting, keep learning, and most importantly: keep enjoying crocheting! And please share your creations, I'm curious about your unique take on the good and bad side of crochet.
Add comment
Comments