


How to use Electrical Wire in Amigurumi for Perfect Masterpieces that Stand and Pose Independently?
You see the most beautiful photos of stunning crocheted creations on social media. In every picture, they adopt a different pose, just as if they are having a real photoshoot! How do those designers manage that?
You probably recognize this: your carefully crocheted doll or decoration can sit, but won't stand without support. Moreover, the neck disappointingly bends, so your beautiful creation can only nod 'yes' and not say 'no'!
You might think these photos are edited with AI, but I have the real, professional solution for you. The technique that makes the difference between a 'cuddle toy' and a form-retaining masterpiece is electrical wire!
Electrical wire is the solution for creations that you can not only put in different poses, but that also offer the stability and rigidity your decorative amigurumi needs.
Why Electrical Wire?
From Cuddle Toy to Art
Crocheting a super fun bear that you can cuddle with does not need extra support, provided it is well-stuffed and the eyes are safe. Such a bear can be cuddled lovingly and can even go into the washing machine if it gets very dirty.
Crocheted dolls that you can constantly change clothes on, that go to bed with you, and that you can have tea parties with, only need proper stuffing in the body, arms, and legs. It's often helpful to add some extra support in the neck, but that’s it.
But if you want to turn a crocheted creation, like a chef, for example, such as my Chef Antoine, into a masterpiece, proper stuffing alone is not enough.
Chef Antoine can be placed in different positions, he can hold a tray with the most delicious cookies, and, very importantly: he can stand on his own!
Electrical Wire, the solution for:
- Bending necks, so the head of your creation stands up proudly.
- Arms that won't stay in place and only hang down alongside the body.
- A unique, expressive pose, which is now possible.
Just look at Chef Antoine, he easily takes the hot cake out of the oven with both hands or he presents his cookies in one hand and in the other hand he still has a leftover whipped cream on his whisk!


The Best Choice: Electrical Wire vs. Craft Wire
The electrical wire I use is black installation wire of 1.5mm²; this has a diameter of about 2.8mm. Although I myself have a roll of 100 meters, rolls of 5 meters are also available at hardware stores. Perfect to start with!

The advantages of insulated electrical wire
- Rigidity: Electrical wire has a perfect balance between flexibility and stability. It is thicker than standard iron wire, so it won't break easily. A frame made of thin iron wire will not allow your amigurumi to stand upright.
- Safety: The plastic coating (insulation) of the electrical wire protects the yarn against wear. The wire also won't snap or poke out of your amigurumi easily.
- Availability: You can easily buy electrical wire or installation wire at any hardware store. They sell rolls with 5 meters of wire, so you can get started right away.
A Quick Comparison
| Type of Wire | Thickness (Diameter) | Suitable for | Core Advantage/Disadvantage |
|---|---|---|---|
| Electrical or Installation Wire | Approx. 3mm thick | Creating a frame for the body, arms, and legs of an amigurumi. | Sturdy, easily bendable |
| Thin Iron Wire or Craft Wire | Approx. 1mm thick | Creating a frame for the fingers of an amigurumi. | Easy to bend for small fingers |
| Coloured Aluminum Wire | Approx. 2 to 3mm thick | Making glasses, or perhaps a nice handle for a small lantern! | Decorative, easily bendable |
| Chenille Wire (Pipe Cleaner) | Approx. 1 to 6mm thick | Creating reinforcement for a tail, for example. |
The indispensable tools
To work with wire safely and efficiently, you need the right tools:
- Wire Cutters: Indispensable for cutting the iron wire or electrical wire to the correct length. This is also handy for cutting the tip off a wooden skewer if you use it as neck support.
- Round-Nose Pliers: Ideal for bending colored aluminum wire into, for example, a pair of glasses or a nice handle for a small lantern.
- Flat-Nose Pliers: I often use these pliers to pull my needle through a piece of work when attaching arms and legs.

Step-by-Step Plan: The CB's Creations Flexible Frame Technique
1. The Right Preparation: Make a frame for each arm and leg. The length of wire you need for this should be slightly longer than the arm or leg itself. For example, if you are going to make an amigurumi creation that will be 30 cm tall, you need about 30 cm of electrical wire per arm and per leg. If you keep the wire piece for the leg slightly longer, it will also fit directly into the body. Pre-bend the wire into the correct shape. Also, prepare the thin iron wire for the hands.
2. Safety First: When making the frame shape, twist the wire together. You can optionally tape the ends of the wire with some tape or duct tape if you prefer. The way the frame is constructed prevents it from poking out of the body. The wires from the legs are twisted together for more stability in the body. You can tape the ends there too. The same applies to the arm wires, which you twist together and point upwards to attach the head.
3. Placement in the Body: Every pattern clearly describes when to insert the frame into the leg or arm. This is always before stuffing that specific part.
4. Stuffing and Shaping: As soon as the electrical wire is inside a leg or arm, crocheting can be a little trickier because the wire sometimes gets in the way. You can temporarily bend the wire away from you. We carefully stuff the arms and legs around the wire. Use a chopstick or a wooden skewer to push the stuffing firmly around the wire. Try to stuff as evenly as possible. You can also always squeeze the arms and legs into shape for a neat look.
Tip: Incorporating Wire into the Fingers
The pattern will also explain when to make a thin iron wire frame for the fingers. This frame is attached to the electrical wire frame that goes into the palm of the hand. Because thin iron wire is sharp and might prick you while crocheting, you can also place some tape over the end.


The Conclusion of the Step-by-Step Plan:
Now that the frame has been incorporated safely and stably into the crocheted parts, the toughest technical steps are behind you! Your creation now has the essential 'backbone' needed for every masterpiece. Stability is guaranteed. You can now confidently continue finishing your amigurumi and enjoy the many posing possibilities!
Frequently Asked Questions & Maintenance
Is working with wire difficult?
Many crocheters wonder: "Isn't it too difficult to work with electrical wire?" I understand the doubt. Even Christine, one of my pattern testers, struggled with it at first and had never worked with electrical wire before.
She decided to take the plunge and incorporated the wire into the arms and legs, exactly as described. Her experience? It worked out excellently! Yes, sometimes the wire can get in the way while crocheting, but the reward is huge. Christine now has figures where she can set the arms and legs in different positions, making her photos even more fun and the story more vivid!
It takes some getting used to, but it gives your creation that professional look and that little extra flair.
Is electrical wire really necessary in every pattern?
Using electrical wire is never mandatory. All my patterns can be realised without a metal frame if you prefer not to use one. If you omit the wire, ensure firm stuffing and use a piece of sturdy plastic or cardboard in the soles so your creation can stand better.
However, there is an important trade-off between functionality and safety:
- For Cuddle Toys: Do you want the amigurumi to be washable and safe for small children? Then omit the wire!
- For Masterpieces: Do you want the creation to stand independently, pose, and have that unique expression? Then the stability of electrical wire is a must.
Can I wash an amigurumi with a wire frame?
No, a crocheted creation with a wire frame, especially one made of iron or electrical wire, cannot be put in the washing machine. The wire can rust, and the insulation can become damaged, which can harm the yarn. Furthermore, a doll loses its shape in the machine. If your creation has gotten dirty, treat stains locally (spot-cleaning) with a damp cloth and some mild soap.
What if the wire pokes through the crochet work?
This is a legitimate safety concern, but due to the thickness and insulation of electrical wire, the chance is small. The best prevention lies in the preparation: always securely tape the ends of the wire (as described in the Step-by-step Plan). Also: ensure you stuff the doll firmly and evenly. The stuffing acts as an extra barrier between the wire and the crochet work.
Can I use electrical wire in smaller parts too?
Absolutely! Although we mainly talk about the arms, legs, and body, electrical wire is also perfect for:
- Tails: To give a tail a fun, curly pose.
- Ears or Antlers: To make these parts stand up nicely, especially if they are heavy or large.
- Accessories: To put inside a crocheted hammer, for example, or the handle of a basket.
For very small and delicate parts, such as fingers, I recommend the thinner craft wire, as discussed in the comparison table.
Conclusion: From Crocheting to Shaping
Now that you have read the complete guide, you know the secret behind those beautiful, poseable creations you see on social media. The transition from crocheting a simple plushie to creating a form-retaining masterpiece is a matter of the right knowledge and the right materials.
You now know exactly:
- Why insulated electrical wire is superior to any other craft wire for stability and safety.
- Which tools you need to bend and integrate the wire perfectly.
- How to safely and invisibly incorporate the frame into your amigurumi using the CB's Creations step-by-step plan.
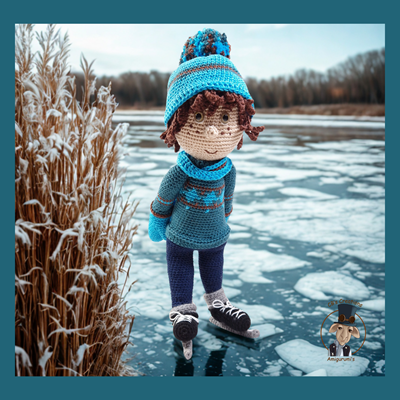
The technique is now in your hands! You no longer have to settle for a doll that can only sit or nod. Your next crocheted creation can stand tall, hold an object, and adopt a unique, expressive pose. Think of the independently standing Chef Antoine or the dynamic skating pose of Ice Skater Hein!

Ready to Start?
Do you want to put this technique into practice immediately? The easiest way is to start with a pattern specifically designed for a flexible frame.
Try it yourself: You can choose the charming Chef Antoine or the challenging, dynamic Skater Hein. Follow the step-by-step plan from this blog and create your first perfectly poseable masterpiece!
Check out All Patterns, there you will find more patterns where you can use your electrical wire!
Share your results and unique poses via social media! I am very curious about your 'From Cuddle Toy to Art' transformation!
Add comment
Comments