


Stuffing like a Pro: The basis for a perfectly formed amigurumi
The invisible foundation of quality: The art of stuffing
What is the difference between an amigurumi that is 'just okay' and a creation you can truly be proud of? Often, the secret isn't on the outside, but in what happens on the inside. There are a few crucial steps that make the difference between a simple project and a professional-looking result that is perfect for gifting or displaying.
It starts with the basics
The way you crochet determines how tight your creation looks. Do you crochet a bit loosely? Then using a smaller crochet hook is often the solution. By keeping your stitches compact and tight, you create a sturdy foundation that prevents the stuffing from peeking through.
Shape comes from within
Then there is the technique of stuffing and reinforcing. Nothing is more disappointing than a beautifully crocheted character with dents, lumps, or floppy arms and legs. And we all know the problem of 'wobbly heads' – a challenge that is often easily solved with the right reinforcement.
What will you learn in this blog?
My goal is to teach you how to stuff your amigurumi so perfectly, firmly, and shapely that every creation that leaves your hook is solid as a rock. I’ll share my tips and tricks so that from now on, you’ll make amigurumi that are not only beautiful but also retain their shape!
Choosing the right stuffing – The foundation of your work
Before we dive into the technique, we need to talk about the material. Although stuffing is often "invisible," your choice of material largely determines the end result.
The classic: Synthetic Polyester (Fiberfill)
Most crocheters use synthetic polyester stuffing, such as the popular Panda Stuffing. This is a fantastic choice if you are making amigurumi intended for play. It is feather-light, resilient, and perfectly washable. Ideal for children's toys that need to stay soft and huggable.
My personal choice: The power of "firm" stuffing
As you might know, I often create pieces that are intended as decorative showpieces rather than toys. For these types of projects, I make a different choice: I use a firmer stuffing.
The big advantage is that this stuffing is less "bouncy," which makes it much easier to knead into a specific shape. Once shaped, it stays exactly as it is.
- Where to find it? You can buy this firmer stuffing brand new (often sold as cushion filling or 'firm fiberfill').
- Recycling: Of course, you can also use the stuffing from a new or unused pillow or duvet.
Yarn scraps: A clever but risky choice
Do you have a pile of cut-off yarn ends lying around? You can use them as stuffing, but be careful. Only use them in the center of a larger part and ensure there is enough regular stuffing around them. If you don't, the colors of the scraps might shine through your crochet work.
Stuffing around a frame
When I work with a frame, I also prefer using firmer stuffing. I place it very precisely around the wirework. The stuffing provides extra support to the frame, making your creation even more stable.
Tip: Want to know exactly how I make a frame from electrical wire? Read my blog: How to use electrical wire in your amigurumi!

Different kind of stuffings

Using soft stuffing for cuddly toys
Stuffing around the neck with a frame in the body
The right tools and the "dosage"
Now that we have the right stuffing, it’s time for the execution. Two things are essential here: what do you use to stuff, and how much do you put in?
Never use just your fingers!
It might seem logical to use your fingers, and for large parts like a belly, that works fine. But for narrow corners, small paws, and the final tiny openings, your fingers are simply too big. You often won't press the stuffing deep enough, creating empty gaps.
My favorite tools are:
- The back of a thick crochet hook: Ideal for pressing stuffing down firmly.
- A large pair of tweezers: Perfect for getting small tufts exactly in the right spot.
- A wooden chopstick: Perhaps the best budget tip! It works very well to push the stuffing in firmly.
⚠️ A major warning from personal experience: Never use scissors to push stuffing in. It has happened to me in the past: you think you're just using the point to push stuffing into a corner, and before you know it, you’ve poked right through your crochet work. A waste of all your hard work! Learn from my mistake and keep sharp objects far away from your stuffing process.
How much is enough? The balance between firm and bouncy
This is the most frequently asked question: when do you stop stuffing? The secret lies in the balance. Your amigurumi must be firm enough to hold its shape when you pick it up or set it down, but it should still feel pleasant to the touch.
Your amigurumi should feel firm but should still give slightly when pressed, without leaving a permanent dent. It should be so firmly filled that it is still “malleable,” meaning you can press it slightly and it immediately springs back to its original shape.
Watch out for these two pitfalls:
- Too little stuffing: You’ll get wrinkles in your crochet work, and the figure will eventually sag over time.
- Too much stuffing: You stretch the stitches too far, causing the stuffing to peek through the gaps. That’s exactly what we want to avoid for a professional look!

Handy to use when filling are the back of a crochet hook, long straight tweezers or chopsticks.
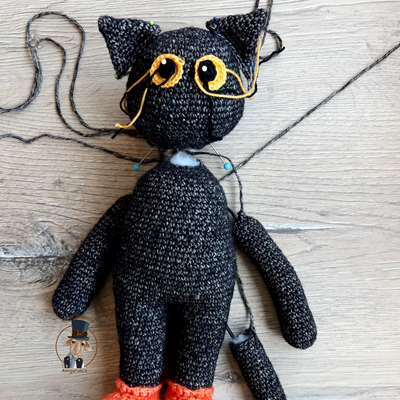
Cat Simsala only needs to be assembled. An extra reinforcement in the neck is needed here.
The perfect stuffing technique
How do you ensure your amigurumi gets that beautiful, smooth shape without lumps? The secret is patience.
The power of small tufts
This is perhaps the most important tip I can give: always fill in small tufts. Never cram one large ball of stuffing into your work. This inevitably creates hard lumps and empty spaces. Instead, take a small tuft of stuffing each time, pull it apart slightly ('fluffing'), and push it against the walls of your crochet work. By working in layers, you build stability from the inside out.
Don’t wait until the end: Stuff while you crochet
In all my patterns, I indicate when to start stuffing. Often, it also says to keep stuffing while you crochet! It is much easier to fill narrow and small parts, such as fingers, arms, and legs, as you go. If you wait until the piece is finished, your tools will never reach the very tips of the hands or feet properly.
Dare to knead
Don't be afraid to firmly knead a stuffed arm or leg into shape! Especially if you use the firmer stuffing I mentioned earlier, this works perfectly. You force the stuffing into exactly the shape you have in mind.
The final touches: Stuffing to the edge (and beyond)
A common mistake is stopping too early. To prevent your amigurumi from becoming limp at the seams, continue stuffing until the very last round. Use your tweezers or the narrow end of the chopstick for the final bits.
Stuffing a neck
Are you sewing a head onto a body? Sew them three-quarters of the way together first. Use the small remaining opening to firmly stuff the neck one last time around the extra reinforcement you've already placed inside. This ensures the reinforcement cannot shift and the neck fits snugly against the head.

Filling the feet and legs while crocheting.

Fill the fingers and the hand right away, otherwise you won't be able to reach them once the arm is crocheted.

You can knead the arms very well into shape!
Heads and necks: The art of stability
The neck is often the most challenging part. It’s such a shame when a beautifully crocheted figure starts drooping its head after a while. Because the neck is the narrowest point and must carry the heavy head, we need some extra help here. I use three proven methods:
1. Internal reinforcement: "The sausage" or hair roller
The neck needs support from the inside. A popular method is crocheting an extra 'part' (often called a "sausage"). This is a tightly crocheted and firmly stuffed roll that you slide exactly into the neck. You can also use a foam hair roller or even a (clean!) small paint roller for larger creations.
Read all about it in my blog: How do I reinforce the neck of my crocheted doll?
2. The invisible frame: electrical wire
Want your creation to not only stand firmly but also strike a proud pose? An electrical wire frame is the ultimate solution. The wire runs from the arms and legs through the body and bends up deep into the head. Place your firm stuffing precisely around this wire so the frame cannot shift.
Discover how to build this frame yourself: How to use electrical wire in amigurumi?
3. Assembly: No more crooked heads with Amigurumi Sticks
Even with the best stuffing and reinforcement, sewing the head perfectly straight onto the body can be tricky. The solution? Amigurumi Sticks. You pierce these long, decorated needles through the head into the body. They hold everything perfectly in place while keeping your hands free to sew.
Don't forget: Always use the technique from the chapter The perfect stuffing technique in combination with these reinforcements for the best result.
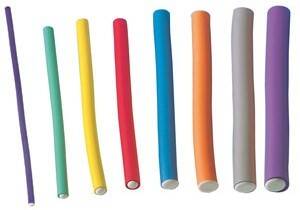
Plastic hair curler as a solution to strengthen a neck.

Electrical wire also forms a solid base for the neck of your creation.

Pin the head to the body with Amigurumi Sticks. You then have your hands free to sew the head on the body.
Conclusion: From 'just stuffed' to a great showpiece
As you can see, stuffing an amigurumi is much more than just filling a crocheted shape. It is the invisible foundation that determines whether your creation stands the test of time. Whether you choose soft Panda Stuffing for a huggable friend or firmer stuffing that you can knead perfectly into shape for a decorative showpiece: the technique makes the difference.
Patience is your most important tool
If there is one thing I want you to take away, it is this: take your time. Those extra five minutes spent 'fluffing' your stuffing, filling in small layers as you follow the pattern, and carefully reinforcing the neck will show immediately in the final result. No lumps, no wrinkles, and most importantly: no more wobbly heads!
Your creation, your pride
By paying attention to the "inside," you turn your handiwork into a high-quality item you can truly show off. A well-stuffed amigurumi radiates craftsmanship.
I am very curious: which tip from this blog are you going to try out during your next project? Do you have a golden stuffing tip of your own? Let me know in the comments!
Add comment
Comments